| Applies to:
PcVue 15. |
||||||||||||||||||||||||||||||||||||||||||||||||||
|
|
||||||||||||||||||||||||||||||||||||||||||||||||||
| Summary:
A silent installation is an installation that does not display messages or windows during its progress. This article covers silent installation of PcVue version 15. The purpose of this document is to describe the main command lines necessary to launch silent installation. For more information you can also download the complete reference guide for version 12, its content is mostly compatible with version 15. |
||||||||||||||||||||||||||||||||||||||||||||||||||
|
|
||||||||||||||||||||||||||||||||||||||||||||||||||
| Details:
General Information There are several ways to launch command lines. This document talks only about command files (.cmd extension). These command files must be run as Administrator, because most of installation operations require elevated privileges. We therefore consider using following elements:
Installation process The installation consists in several steps.
This article will discuss only about First installation, Update and Patch. Silent install can also be used for Reparation, Modification (Add and/or remove features) and Uninstallation. Command lines samples The command lines need to be written in the Silent.cmd file. 1 – Core and Wdt prerequisitesThe first step of a first installation is to install the prerequisites. Start /wait D:\Prerequisite\PrqCore.exe /quiet /norestart /NoPrompt SilentMode=1 Start /wait D:\Prerequisite\PrqWdt.exe /quiet /norestart /NoPrompt SilentMode=1 2 – Core and WDT first install or updateBy default installation The following command lines install Core and WDT by default, with the installation language set to French. The by default installation language is English. You can change it by using the /L parameter followed by the language code you wish. Using a specific installation language changes the installation behavior for the following: – Shortcuts created in the given language Below each supported language codes:
Start /wait D:\Core\Setup.exe /clone_wait /L1036 /s /v”/quiet /norestart /l*v C:\Log\Install.log” corresponds to core HMI/SCADA installation without any additional feature:
Start /wait D:\Wdt\Setup.exe /clone_wait /L1036 /s /v”/quiet /norestart /l*v C:\Log\Install.log” correspond to Wdt installation:
Customized installation: Change the Features Customization is only available for Core. Wdt does not offer custom setup type.
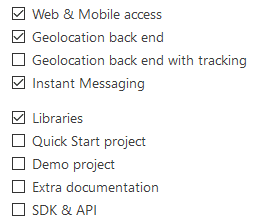
This method allows preselecting any feature proposed on StartScreen Start /wait D:\Core\Setup.exe /clone_wait /s /v”/quiet /norestart ADDFEATURE=<list of preselected features> /l*v C:\Log\Install.log” For example: To install basis program files, excluding database manager, with Web & Mobile access, Geolocation back end, Instant Messaging and Libraries, you must use this instruction: Start /wait D:\Core\Setup.exe /clone_wait /s /v”/quiet /norestart ADDFEATURE=Backend,Backend_Geoloc,Msg,Lib /l*v C:\Log\Install.log” In not-silent mode, this would correspond to the following user choices during installation:
The table below list the mnemonics corresponding to each available preselection
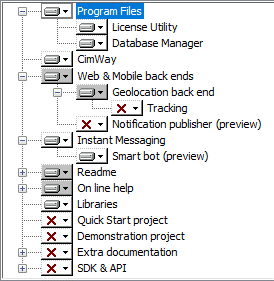
This method allows selecting features, which are not directly pre-selectable on StartScreen Start /wait D:\Core\Setup.exe /clone_wait /s /v”/quiet /norestart ADDFEATURE=<list of preselected features>,<list of hidden features> /l*v C:\Log\Install.log” For example: To install basis program files, including database manager, with Web & Mobile access, Geolocation back end, Instant Messaging, Libraries and Smart Bot (preview), you must use this instruction: Start /wait D:\Core\Setup.exe /clone_wait /s /v”/quiet /norestart ADDFEATURE=Backend,Backend_Geoloc,Msg,Lib,Main_Dmt,Msg_Bot /l*v C:\Log\Install.log” In not-silent mode, this would correspond to the following user choices during installation:
The table below list the mnemonics corresponding to useful hidden features
|
| Custom Setup feature name | ADDFEATURE value |
| Database Manager | Main_Dmt |
| Notification publisher (preview) | Backend_Push |
| Smart bot (preview) | Msg_Bot |
3 – Core and Wdt Patch
There is only one command line, since patches are distributed as bundles embedding both Core and WDT patches.
Start /wait “” “D:\Patch\15.0.3_PcVue_Patch for 15.0.0 or later.exe” /quiet /norestart
 First Installation case
In case of first installation, you need first to install Core and/or Wdt, using commands above, then the patch, if it exists.
If the patch exist, you will find it in the Patch directory of the DVD
Created on: 12 Jan 2021 Last update: 04 Sep 2024


