| Applies to:
Sentinel keys (SuperPro, UltraPro, Sentinel Hardware Keys). |
||
|
|
||
| Symptom:
This guide is intended to assist our end-users troubleshoot issues with Sentinel keys. |
||
|
|
||
| Details:
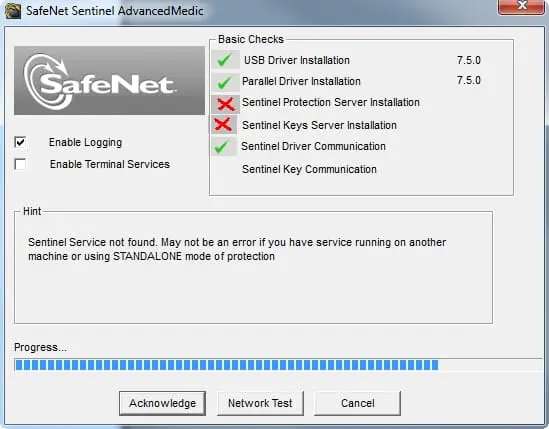
Diagnostic Utility – Sentinel Advance Medic Sentinel Advance Medic (SAM) utility is used to detect that a Sentinel key (SuperPro, Ultrapro, or Hardware key), or Sentinel Driver are installed properly and working fine. Using SAM you can also generate log file for analyzing the issue if any. From where to install: You can download the Sentinel SuperPro Medic utility from the hyperlink given below: https://supportportal.thalesgroup.com/ How to use Sentinel Advance Medic: ⇒ Make sure the key is securely attached to the port. Following is the screenshot from Sentinel Advance Medic: You should have red cross, as can be seen in the picture above. Click Acknowledge button to ignore checks about Sentinel Protection Server and Sentinel Keys Server. Finally you should have this result if everything is OK:
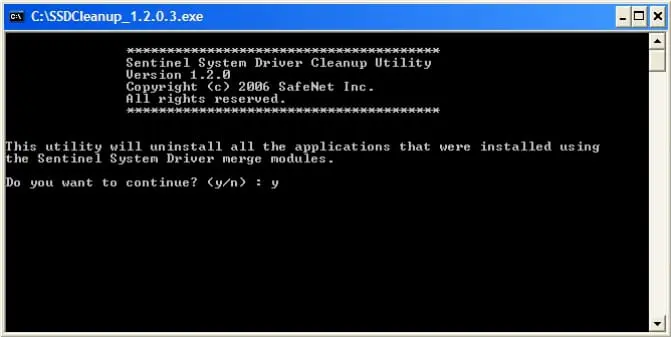
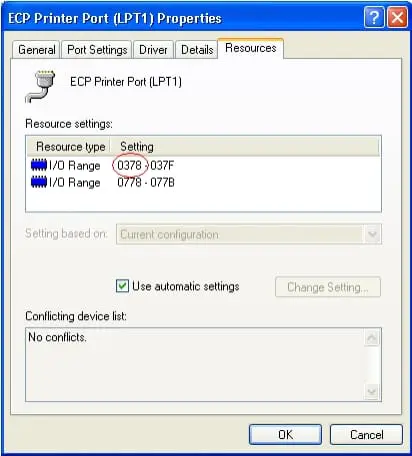
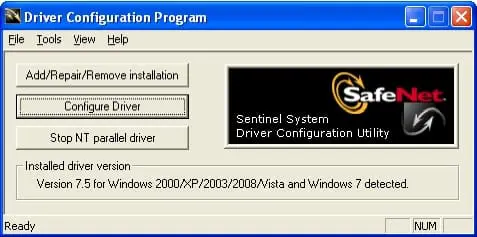
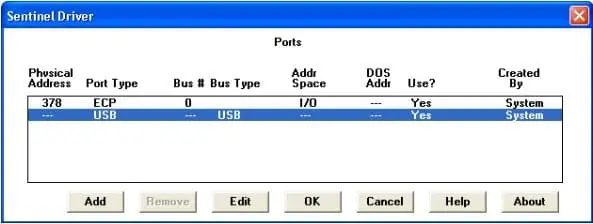
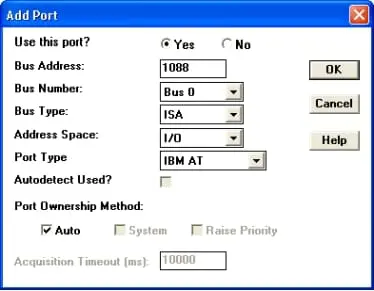
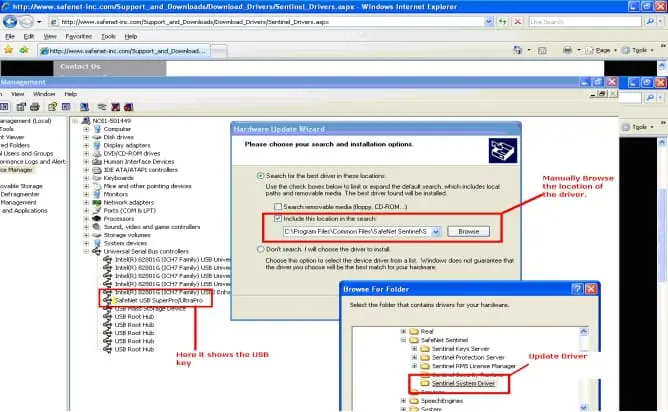
Cleanup Utility – SDCleanup SSDcleanup.exe is a utility, which removes all installations of Sentinel System Driver from the system. The purpose of this utility is to solve the “sticky” installation problems faced by the customer. The “Sticky” installation problem relates to that state of Sentinel driver installation, which leaves the customer in a situation where he can neither install newer version of the driver nor un-install the older one. This utility will clean up all the installed Sentinel Drivers and bring the system to a state it was before installing any of the Sentinel Drivers. From where to download: https://supportportal.thalesgroup.com/ How to use SSDCleanup: Run the SSD Cleanup utility only if there are issues uninstalling the older version of the driver. In normal situations, the steps given for un-installation should be enough. Note: We recommend using the normal driver un-installation (Control Panel _ Add or Remove Programs) for the drivers. SSDCleanUp might remove your Sentinel protected software application and other Sentinel SDK installation. Therefore, SSDCleanUp should be used as the last option for driver uninstall. 1). Use the link below to download the SSDCleanUp utility. https://supportportal.thalesgroup.com/ 2). Reboot the system. Following is the screenshot from SSDCleanUp utility: Driver Installation / Uninstallation Steps for installing the Sentinel Drivers: 1. Please make sure that the key(s) is /are unplugged. 2. Download the latest Sentinel Protection Installer from the link: 3. Do a custom Install by selecting only USB System Driver and Parallel Driver. 4. Click Next to proceed with the installation. 5. When installation is finished, restart your machine, then connect your key. Try to find the key with Sentinel SuperPro Medic and Sentinel Advanced Medic, as explained earlier in this document. Sentinel System Driver. What gets installed? The default installation locations are: Windows 32-bit is C:\Program Files\CommonFiles\SafeNetSentinel\Sentinel System Driver For Windows NT, 2000 and XP (32-bit), Server 2003 (32-bit) and Vista (32-bit) the following driver files will be installed in the C:\Windows\system32\drivers directory. For Windows XP (64-bit), Server 2003 (64-bit) and Vista (64-bit) the following driver file will be installed in the C:\Windows\system32\drivers directory Steps to uninstall the Sentinel Protection Installer 1. Unplug the key(s) 2. Uninstall: the Sentinel Protection Installer. To uninstall Sentinel Protection Installer/Sentinel Keys Protection Installer or Sentinel Security Runtime. 3. Manually delete the “Sentinel.sys” and “sntnlusb.sys”, or “skeysusb.sys”, or “Sentinel64.sys” and “sntusb64.sys” files. 4. To delete the “Sentinel.sys”, “sntnlusb.sys” and “skeysusb.sys” files: 5. To delete the “Sentinel64.sys” and “sntusb64.sys” files: 6. To delete the server and driver files: Parallel Port Settings If you are using a parallel port key then check in the BIOS, the port must be set to “enabled” and not “OS controlled”. Port Converters Sorry USB to Parallel adaptors/converters are not supported as they do not provide a “physical address” (i.e. 378) within Windows. Therefore our drivers can not communicate with the keys. Automatic detection of new Parallel Ports: Our latest “Sentinel Protection Installer” will automatically detect additional parallel ports on PCI/PCMCIA cards (the additional LPT ports should have already been installed in Windows). Manual detection of new Parallel Ports: There are no special installation requirements, just follow the normal installation procedure. 1. From the Control Panel, double-click the System icon to open the System Properties page. 2. Click the Hardware tab and then the Device Manager Button to open the Device Manager. 3. Click the + sign next to Ports (COM & LPT) to expand the tree. 4. Double-click on PCI Card (LPT1) to open the property sheet for the PCI adapter. 5. Click on the Resources tab to see the resources used by the adapter. 1. Install the Sentinel System Driver. 2. Start the driver configuration utility, SetupSysDriver.exe. It is usually located at 4. The following dialog will be displayed. Click the “Add” button. 6. Click on OK. It will show that a User Created port has been added at address 1088. 7. Click the OK button to close the dialog and then open the File menu and choose Exit to close the Sentinel System Driver Configuration Utility. The Sentinel System Driver should now be configured to use the Parallel PCI adapter. Key Not Found Utilities and knowledge required to test and troubleshoot a key that was not found on the system: Sentinel Medic Application or Sentinel Advance Medic Basic knowledge of the Windows operating system. Basic knowledge of browsing utilities in a Windows environment. Ability to browse to the BIOS of a specific system for configuration change (in case of parallel Keys). Troubleshooting for parallel Keys USB to parallel port converters are not supported. Please contact your Software vendor if you want to use a USB key instead of a parallel key. 1. Check if the key is properly attached. The key should not be damaged. 2. Please make sure that drivers are installed properly by running Sentinel advance medic. 3. If there are any issues with the driver, please uninstall and reinstall the driver. 4. For uninstalling and driver cleanup please refer Driver Installation/Uninstallation and CleanUp utility. Things to look for: B) If the drivers are installed and your program still doesn’t find the key, please try our utility Sentinel SuperPro Medic or Sentinel Advanced Medic, found on Safenet web site, under downloads; choose SuperPro as the product and look under Other Downloads. You would install this product and run it. With SuperPro Medic, select the Mode you are using and click on Find SuperPro. With Sentinel Advanced Medic, click Troubleshoot. Troubleshooting for USB Keys 2. Go to Control Panel>System>Hardware 3. Click on Device manager 4. Make sure there is no (!) mark or (x) mark on Safenet USB SuperPro/UltraPro or Sentinel Hardware Keys icon. 6. If there is an (x) mark or (!) mark on Safenet USB SuperPro/UltraPro or Sentinel Hardware Keys icon. Follow the steps to uninstall the driver and reinstall the driver described in pic. 7. If no marks are displayed, please make sure that the driver is installed properly by running Sentinel Advance Medic, refer to previous chapter. 8. If you experience any issues with the driver, please uninstall and reinstall the driver. 9. For uninstalling and cleanup, follow the steps described in previous chapters. Driver Not Loaded Correctly Remove Sentinel Driver installation using SSDCleanup.exe. For details on how to use SSDCleanup please refer CleanUp utility. Reinstall the latest driver from the link given below: Windows Error Messages Sometimes we encounter with some of the windows error like Error – 1325, Error 1378, |
||
|
|
||
|
|
Created on: 08 Oct 2014 Last update: 04 Sep 2024
