Back

Topic

[KB253]Disabling the AutoPlay option when inserting a USB key

14 years ago
By RM
Options
Print
Applies to:

PcVue all versions supporting Windows 2000, XP and 2003 Server.


Summary:

This article describes how to disable the AutoPlay option before you insert a USB key (dongle).


Details:

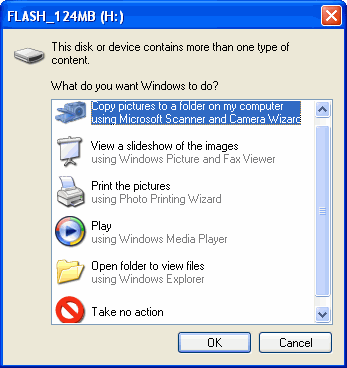
When a PcVue application is locked, it has no access to the Windows Desktop nor to the Task Manager. However if you insert an appropriate USB key in the PC, a dialog opens for choosing a course of action.

AutoPlay_dialog_for_USB_key

When you select Open Folder to View Files, Windows Explorer opens. You then have full access to the PC.

Solution

Here is how to enable and disable the Autoplay feature of Windows when you insert a USB key.

Note

You should always back up the Windows Registry (e.g. by exporting its contents: File.Export) before you modify its contents.

Note

If in doubt about using the Windows Registry, you can consult its Help and the relevant Microsoft TechNet article for the version of Windows concerned.

Firstly you deactivate the AutoPlay option as follows.

  1. Run the Registry Editor utility (Windows Start/Run/RegEdit).
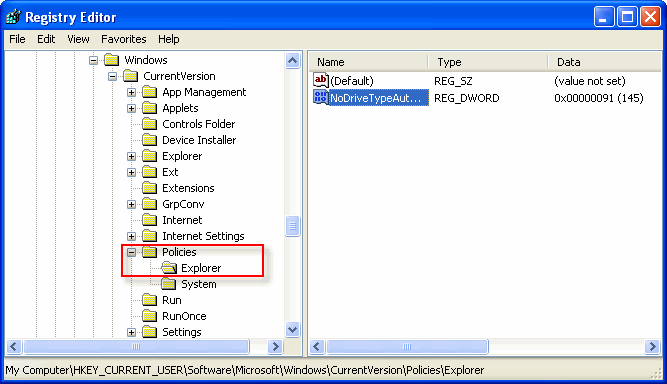
  2. Use Edit.Find to locate the key named NoDriveTypeAutoRun. It is of type REG_DWORD, in the folder HKEY_CURRENT_USER/Software/Microsoft/Windows/Currentversion/Policies/Explorer.

Registry_USB_key_disable_autoplay

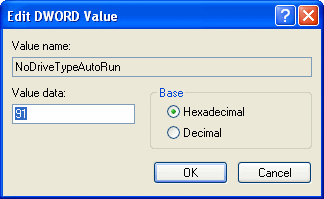
  1. Double-click on the key to open the dialog Edit DWORD Value.

Edit_DWORD_dialog_disable_autoplay

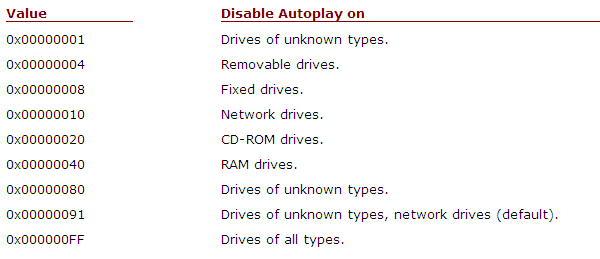
  1. Enter the last two characters of the required value (see table below).
  2. Close the Registry Editor, then log off and on again for the change to HKEY_CURRENT_USER take effect.

Settings

NoDriveTypeAutoRun controls the AutoPlay function for all kinds of media as follows.

AutoPlay_dialog_for_USB_key2

Example

To deactivate all media, assign the key the value 0x000000FF.


Created on: 01 Dec 2010 Last update: 13 May 2024