Back

Topic

[KB873]Checking the network setup when using netbios

Tags: Multistation, NetBIOS, Networking

7 years ago
By f-martinarcinfo-com
Options
Print
Applies to:

From PcVue 6.04 to PcVue 12.


Summary:

This article explains how to check the network set-up on your PC. If you need to add or change settings you should refer to the Windows on-line help.

Using NetBIOS for multistation networking is strongly discouraged since PcVue version 9.0. It is recommended to set-up networking based on TCP/IP only.


Details:

When using NetBIOS, the Supervisor sends and receives information on the LAN using the NetBIOS interface. NetBIOS communicates on the network using the NetBEUI, TCP/IP or SPX/IPX transport protocols. You must have at least one of these protocols installed and the same protocol must be selected on all stations in the network.

A PC may have more than one network interface card (NIC) and protocol installed. The Supervisor uses the NetBios LANA number to identify the combination of the protocol and network interface card that will be used to send and receive NetBIOS messages. The LANA number is entered in the Network Stations configuration.

When using NetBIOS you must use the AiLANA tool provided with the Supervisor to display the available LANA numbers.

How to install the AiLANA tool

  1. Download the AiLANA.zip file available in this article to your hard disk
  2. Extract the files from the zip into a temporary location using an unzip program. The following files will be produced:
    • AiLana.cab
    • Setup.exe
    • Setup.lst
  3. Install the software by running Setup.exe and following the installation wizard.

Using the AiLANA Tool

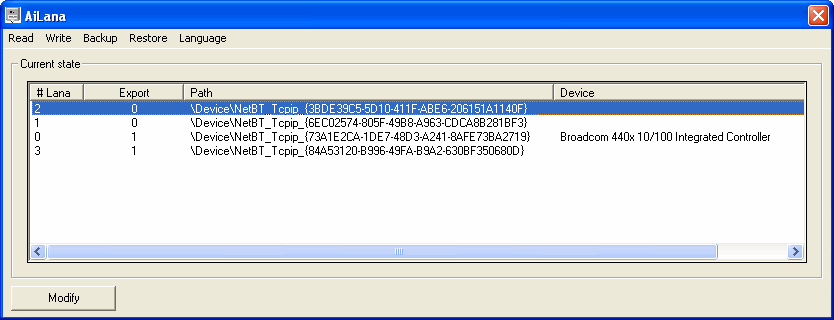
The AiLANA tool can be started from the shortcut placed on the Start menu during installation. Click the Read command on the menu to display a list showing the available LANA numbers.

Menu and Command options

  1. Read – Read the LANA number information from the Operating System and display them on the list.
  2. Write – Write the LANA number information on the list to the Operating System.
  3. Backup – Save a copy of the LANA number information on the list.
  4. Restore – Restore a copy of the LANA information previously made using the Backup command.
  5. Language – Select the display language for the AiLANA tool.

Explanation of the fields in the display list

  1. #Lana – The LANA number referencing the combination of a protocol and network card.
  2. Export – The type of network. 1 indicates a local area network connection. 0 indicates a network connection using RAS (Remote Access Services).
  3. Path – The protocol in use
    \Device\Nbf = NetBEUI
    \Device\NetBT = TCP/IP
  4. Device – The name of the network card if available. Sometimes this information is not available and the field is left blank.

Changing a LANA number

  1. Take a copy of the current configuration using the Backup command. The current configuration may then be restored using the Restore command in the case of erroneous operation.
  2. Select the line containing the LANA number to be changed.
  3. Click the LANA number field and enter the new number. Note that LANA numbers must be unique.
  4. Click the Write command to write the new LANA number to the Operating System.
  5. Click the read command to refresh the list and check that the write was successful.

Download attachments:


Created on: 31 Jan 2018 Last update: 04 Sep 2024